In class @GA_DC, we just “learned” backbone. Although the teachers did an amazing job, it’s just really hard to learn your very first JS framework. In addition to that, because of time constraints we were only able to have about an hour of instructional time on Object Oriented JS prior to the introduction of backbone. So my natural inclination will be to try and learn it better by writing this post. I wanted to go a different direction but my buddy from class convinced me to use the title above. Thanks @CityLims for the title buddy.
In this post, we’re going to be making a one page app. We’re going to call it Reminders, but lets be honest, its a todo App. This post will require knowledge of JS, jQuery, DOM elements and HTML. I’ll be using Backbone’s MV*(Presenter) for basic create and delete functionality for reminders in our reminders app. Also, there will be lots of code, and the comments throughout will probably explain more than the blurbs in between code. Alrighty, so lets get to it.
Lets make a new directory where we want to work from and make some directories and files were going to need, in the terminal:
$ mkdir reminder
$ cd reminder
$ mkdir js/models
$ mkdir js/collections
$ mkdir js/views
$ mkdir js/routers
$ touch ./index.html
$ touch js/models/reminder.js
$ touch js/collections/reminders.js
$ touch js/views/reminder_view.js
$ touch js/views/reminders_view.js
$ touch js/routes/reminder_router.js
Now we’re going to create our skeleton, add our dependencies, and some basic HTML elements, in our index.html:
<!DOCTYPE html>
<html>
  <head>
    <title></title>
  </head>
  <body>
    <h1> Reminders </h1>

    <!-- where the reminders will live -->
    <div class='reminder_container'>

    <!-- the form for reminders -->
      <div class='reminder_form'>
        <form>
          <label>New Reminder</Label>
          <input class ='reminderBody' type='text'>
          <input class ='new_reminder' type='submit'>
        </form>
      </div>
    </div>

    <!-- Jquery cdn, underscore/backbone dependency -->
    <script type='text/javascript' src='https://code.jquery.com/jquery-2.1.3.min.js'></script>

    <!-- underscore cdn, backbone dependency -->
    <script type='text/javascript' src='https://cdnjs.cloudflare.com/ajax/libs/underscore.js/1.7.0/underscore-min.js'></script>

    <!-- Backbone cdn -->
    <script type='text/javascript' src='https://cdnjs.cloudflare.com/ajax/libs/backbone.js/1.1.2/backbone-min.js'></script>

    <!-- loading the rest of our script files, order is important! -->
    <script src='js/app.js'></script>
    <script src='js/models/reminder.js'></script>
    <script src='js/collections/reminders.js'></script>
    <script src='js/views/reminder_view.js'></script>
    <script src='js/views/reminders_view.js'></script>
    <script src='js/routers/reminder_router.js'></script>
  </body>
</html>
Let’s first fill our js/app.js so we can establish a name space and instantiate our Router which we will define later.
In js/app.js:
// Right here, we're going to name space all of our models,
// collections, Views and Routers in an App object so we don't
// pollute the global namespace
App = {
  Models: {},
  Collections: {},
  Views: {},
  Routers: {}
}

// We don't want to instantiate our Router until all the other
// files have loaded.
$(document).ready(function(){
  App.Routers.main = new App.Routers.Main();
  Backbone.history.start();
})
Great, lets knock out a couple easy ones and make our Backbone model and collection.
In js/models/reminder.js:
// This is our Reminder Object with a default for the reminderBody attribute
App.Models.Reminder = Backbone.Model.extend({
  defaults: {
    reminderBody: ''
  }
})
In js/collections/reminders.js:
// This is our Reminders Collection Object that will contain instances
// of our Reminder Model Object
App.Collections.Reminders = Backbone.Collection.extend({
  model: App.Models.Reminder
})
Next we will be creating the constructor function for our Backbone Router. Where we initialize our collection and collection view(also list view).
Note, this programs functionality will be limited; however, should you want people to bookmark your site in different states, a lot of that code would go here. In the future, I may write another post that focuses more on routers and their uses. It is much more robust than the marginal utility that is seen in this program where it’s just used to instantiate our Backbone objects.
In js/routers/reminder_router.js:
// This is our applications main and only router.
App.Routers.Main = Backbone.Router.extend({
// here's where you can route to specific urls, we won't be going
// over that in this post
routes: {
},
// Upon initialize we'll instantiate our reminders Collection and
// Collection View
initialize: function(){
App.Collections.reminders = new App.Collections.Reminders();
App.Views.reminderListView = new App.Views.RemindersView({ collection: App.Collections.reminders})
// Add Some dummy content so the page loads with some stuff.
App.Collections.reminders.reset();
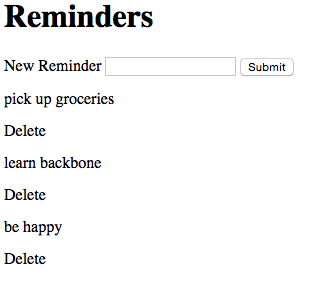
App.Collections.reminders.add({reminderBody: "pick up groceries"})
App.Collections.reminders.add({reminderBody: "learn backbone"})
App.Collections.reminders.add({reminderBody: "be happy"})
}
})Next we will be working on the views. We will have the constructor functions for the Item View(the view for each individual reminder) and the List View(the view for the collection of reminders, which is comprised of Item Views)
The next two js files is where everything is happening and probably the most important of all the others.
In js/views/reminder_view.js:
// This is the constructor function for our Backbone Item View for
// our reminder objects
App.Views.ReminderView = Backbone.View.extend({

  // gives this $el a class name of reminder
  className: 'reminder',

  // add listener for clicking on span with class delete and executing callback onDelete
  events:{
    'click span.delete': 'onDelete'
  },

  // when new Item view is instantiated calls the render function on it
  initialize: function(){
    this.render()
  },

  // creates the reminder with a delete span
  render: function(){
    this.$el.html('<p>'+ this.model.attributes.reminderBody + '</p><span class="delete">Delete</span>')
  },

  // deletes the view and model
  onDelete: function(){
    this.model.collection.remove(this.model);
    this.remove();
  }
})
In js/views/reminders_view.js:
// This is the constructor function for our Backbone list view
App.Views.RemindersView = Backbone.View.extend({

  // declare the domain of the view, in this case div with class
  // reminder_container
  el: ".reminder_container",

  // click event when new reminder is submitted to run the callback,
  // newReminder
  events: {
    'click input.new_reminder': 'newReminder'
  },

  // when a new list view is created adds a listener to when the Collection
  // adds another model also calls addAll function on itself
  initialize: function(){
    this.listenTo(this.collection, 'add', this.addOne)
    this.addAll();
  },

  // creates a new Item View for reminder objects
  addOne: function(reminder){
    var newReminderView = new App.Views.ReminderView({ model: reminder});
    this.$el.append(newReminderView.el);
  },

  // loops through collection and calls addOne on each
  addAll: function(){
    this.collection.each(function(reminder){
			this.addOne(reminder);
    })
  },

  // gets data from form
  getFormData: function(){
    return { reminderBody: this.$(".reminderBody").val() }
  },

  // adds a new reminder object to reminders collection
  newReminder: function(e){
    e.preventDefault();
    var data = this.getFormData();
    this.collection.add(data)
    this.$(".reminderBody").val('');
  }
})
Success! We now have a functional app that can post reminders and delete them as we complete them. If you’ve been following along you should see something like this in your browser:
Toy around with it, create and delete some reminders. I encourage you to dive into the JS and play around with it, maybe add some more attributes add some filtering or editing capabilities. Backbone documentation can be found here Thanks for reading!