
During a group project last week, we utilized the devise gem. I didn’t feel super comfortable with it, especially when we started adding attributes to the model. So I want to write a blog post to solidify what I know so far.
Before I go further, this post assumes a general knowledge of the Ruby on Rails Web Framework, and the MVC relationships inherent on that framework. I’m going to utilize some comments to sorta track stuff too and will be annotated by the following:
# -- some comment here
Check out Michael Hartl’s Online Tutorial to get started on Rails!
Devise is basically a gem that handles User authentication for you. The documentation can be found here
Lets Get Started. We’re going to start a simple new app with Users and they can post a message on their walls…for reminders or something.
The first thing we’ll do is start our rails app: (we’ll be using postgresql database)
$ rails new reminder postgresqlFirst things first, lets make a git repo:
$ cd reminder
$ git init
$ git add .
$ git commit -m "initial commit"
And switch to a new branch:
$ git checkout -b working_branchAlrighty, now lets go into our Gemfile in the main directory and add the gem.
In the Gemfile in the main directory add the gem:
gem 'devise'Now go back to the command terminal and run some commands to install devise:
# -- to install devise gem
$ bundle install
$ rails generate devise:install

# -- the following command will create our User model
$ rails generate devise User
At this point, we now have full fledged User authentication. Just like that. So great, but what does that really give us? Below is a picture of some of the stuff it gave us:
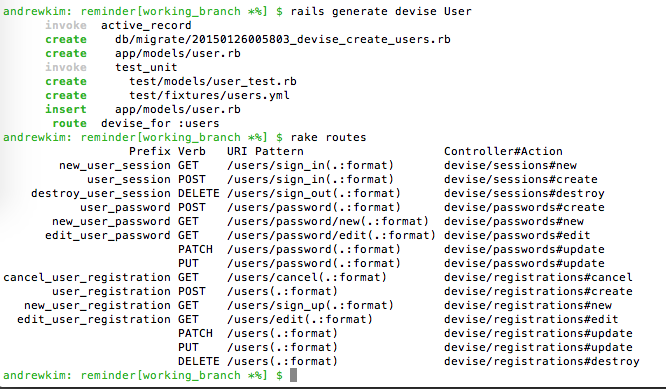
Basically using the different routes will map respectively to the default Devise controller actions.
Lets add some code to the config/environments/development.rb to be able to see devise at work on our server:
config.action_mailer.default_url_options = { host: 'localhost', port: 3000 }Alright, lets go back to the terminal to fire up our database and server, maybe make a commit in between:
# -- migrate database
$ rake db:migrate

# -- commit changes up to now
$ git add .
$ git commit -m "add devise config to env and database migrations"

# -- start up rails server
$ rails s
Lets go to our browser and go to localhost:3000/users/sign_up
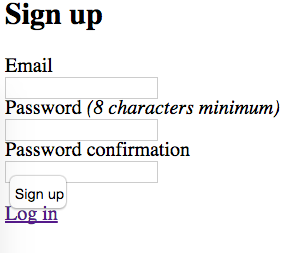
Lets sign up! Once you’ve signed up it should redirect you to the main Ruby on Rails website! Thats good, it means it worked and were now an authenticated rider of rails.
Well this is all well and good, but lets add some stuff to get a better understanding of what this means.
To do this were going to create an additional model Post and its controller:
$ rails g model Post
$ rails g controller posts
In our model files we want to set up our associations:
in app/models/user.rb:
class User < ActiveRecord::Base
  has_many :posts
  # Include default devise modules. Others available are:
  # :confirmable, :lockable, :timeoutable and :omniauthable
  devise :database_authenticatable, :registerable,
       :recoverable, :rememberable, :trackable, :validatable
end
in app/models/post.rb:
class Post < ActiveRecord::Base
  belongs_to :user
end
Now lets set up our migration in db/migrate/(some_date)_create_posts.rb
class CreatePosts < ActiveRecord::Migration
  def change
    create_table :posts do |t|
      t.belongs_to :user
      t.text :body
      t.timestamps null: false
    end
  end
end
Lets run the migration in the terminal:
$ rake db:migrateNow shove all the following code into app/controllers/posts_controller.rb its going to include some devise helper methods like current_user and authenticate_user!:
class PostsController < ApplicationController
  # before any post action happens, it will authenticate the user
  before_action :authenticate_user!

  # another devise helper method that retrieves the user object that has been authenticated
  def index
    @posts = current_user.posts
  end

  def show
    @post = Post.find(params[:id])
  end

  def new
    @post = Post.new
  end

  def edit
    @post = Post.find(params[:id])
  end

  def create
    @post = current_user.posts.new(post_params)
    if @post.save
      redirect_to @post
    else render 'new'
    end
  end

  def update
    @post = Post.find(params[:id])
    if @post.update(post_params)
      redirect_to @post
    else
      render 'edit'
    end
	end

  def destroy
    @post = Post.find(params[:id])
    @post.destroy
    redirect_to posts_path
    end
  private
  def post_params
    params.require(:user).permit(:body)
  end
end
I’m gonna assume we’ve gotten into the habit of commiting changes as we go, use your own discretion
Now that we defined some controller actions, lets make some resources for them in config/routes.rb:
Rails.application.routes.draw do
  # set up root route for devise to reroute to after successful login
  root 'posts#index'

  # alias user routes for account
  devise_for :users, :path => 'accounts'

  # next post resource under user
  resources :users do
    resources :posts
  end
end
Now lets make a view in the terminal:
$ touch app/views/posts/index.html.erband fill it with some barebones content in app/views/posts/index.html.erb:
<h1>Listing your posts</h1>
<%= form_for([current_user, current_user.posts.build]) do |f| %>
  <p>
    <%= f.label :body %><br>
    <%= f.text_field :body %>
  </p>
  <p>
    <%= f.submit %>
  </p>
<% end %>

<ul>
  <% @posts.each do |post| %>
  <li><%= post.body %></li>
  <% end %>
</ul>
Great, now we can sign in, and make some posts, but if we clear our cookies we’ll be redirected to log back in.
Lets shove a quick signout link into our layout file app/views/layouts/application.html.erb
<h3><%= link_to 'Signout', destroy_user_session_path, :method => :delete %></h3>Great! We’ve now got our site Reminder running with basic create and read functionality for our Post model. Go in, fiddle around and test the accessibility of each user you create. This blog post was to give you a basic overview of how to run and utilize Devise at a basic level. There are lots of neat tricks that can be done with Devise that can be found in its documentation. Thanks for Reading!